How to Take Advantage of Apple In-App Events?
This article is a guest post by ShyftUp, a leading ASO agency specializing in App Store Optimization (ASO), Apple Search Ads, Google App Campaigns, Meta Ads, TikTok Ads and more. Reach out to them today for a free consultation.
If you’re not using Apple’s in-app events, you’re missing out on a huge opportunity. With nearly 2 million apps on the App Store, it’s clear that you need to use every tool at your disposal to gain a competitive edge. And in-app events might be exactly what you’ve been looking for.
In this post, we’ll dive into what in-app events are, why they matter, and how you can make the most of them.
What are Apple In-App Events?
As the name suggests, In-App Events are events that take place within an app. Apple defines them as “timely events within apps and games — such as game competitions, movie premieres, livestreamed experiences, and more.”

These events can show up in various places across the App Store, including your app’s product page, search results, editorial picks, and even on the Today, Games, and Apps tabs.
How does In-App Events work?
Once you have your In-App Events set up and live, your target audience should be able to see them in the App Store as event cards. These cards include your event name, a short description (which appears on iOS 15 and iPadOS 15 or later), images, or video if you’ve added one.
When a user sees your event card, they have the option to tap on it, and the App Store will then show them your event details page. The event details page expands on your event card, showing a longer event description, plus notes indicating whether an in-app purchase or subscription is required to join your event.
Moreover, while users are on the event details page, they have the option to opt in and receive a notification once your event starts in the App Store. They can also share your event with friends and contacts via social media or Messages.
A neat feature of In-App Events is that they encourage potential users to download your app directly from the event card if they haven’t already. Once they’ve downloaded your app, they simply need to tap the Open button, which redirects them to the specific part of the app or game linked to the event.
How to create In-App Events?
To start using In-App Events, go to the App Store Connect dashboard where you can set them up and manage all your events. Once you’re in the dashboard, check the left sidebar. Select In-App Events, then click on Create In-App Event. You can also click the add button with the plus sign.
From there, follow these steps:
- Enter your unique reference name. You can use the reference name to quickly identify your event in case you create more in the future. You can type a reference name with a maximum of 64 characters. Please note that the reference name is only visible in App Store Connect and will not show on the App Store or Apple Games.
- Add the event name, which will appear on the App Store and Apple Games. The event name can be up to 30 characters long.
- Add a short description, which can have a maximum of 50 characters. The short description appears on your event card and will show in the Today tab and Search.
- Enter a long description, which is crucial when your users arrive at your event details page. You can type up to 120 characters for the long description.
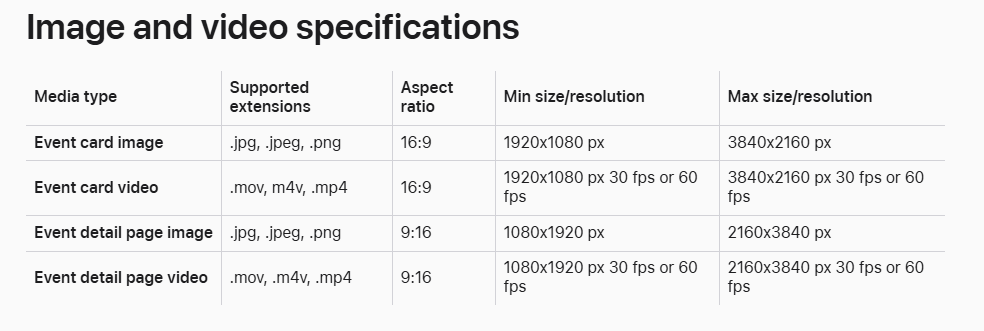
- Upload images. A video is optional, but it can make your event card stand out. Use the correct specifications.
- Select a badge that best represents your event type. These are 7 in-app event badges you can choose from, which include the following:
- Live Event: These are real-time activities that all users can participate in. A good example of this is a live-streamed concert or a special broadcast.
- Premiere: Do you have content or media to release for the first time? If yes, then you should choose the premiere badge.
- Challenge: Your users would need to complete a goal before the event ends. For instance, you have a fitness app and you run a challenge where your users should reach a specific number of steps in one week.
- Competition: Invite your users to compete with each other like in a tournament. The one with the highest score or rank wins.
- New Season: This is perfect when introducing new content related to a season. Think of having a new season of television shows or media libraries.
- Major update: Choose this when you want to introduce a significant and huge new feature. Maybe you want to launch a new type of game or level in your app.
- Special Event: So, you have checked other badges, and your new activity couldn’t just fit within them. If that’s the case, you can select Special Event provided that you’re adding new limited-time events.
- Choose the primary language for your event.
- Go to the Country or Region Available setting to specify where your event will appear in the App Store or Apple Games. If you don’t change this, your app will appear on all storefronts by default.
- Select the date and time when your event will be visible or discoverable to users. Include the date and time the event will start and end. Please note that you can only schedule your event up to 14 days in advance of the start date.
- Include an event deep link. The event link appears as an Open button on the In-App Event card. If tapped by users, the Open link would redirect them to your event’s details page where they can learn more about your event and even download your app. This page provides users with more information about your event and gives them a chance to download your app. You can use a universal link or a custom URL as your event deep link, although the universal link is more preferred as it gives a higher level of security. Take time to learn more about universal links.
Best practices to take advantage of In-App Events
While Apple’s In-App Events feature is powerful on its own, there are still other things you can do to dramatically improve your results. Don’t just create In-App Events. Make sure you optimize them.
Here are some effective tips to help you take full advantage of In-App Events:
- Promote your In-App Events. There are plenty of ways to do this. You can send emails to your subscribers, advertise your events on social media, and create promotional videos, blog posts, and other forms of content.
- Use the App Store Connect API. This tool simplifies your workflow by automating the upload of metadata and the submission of current and future events.
- Choose your In-App Events wisely. Not every event is worth featuring. Apple recommends using In-App Events for challenges, special content launches, and competitions. Avoid using them for routine activities like daily tasks or recurring rewards. Price promotions also aren’t ideal unless you’re introducing new goods, features, or content. Additionally, don’t use In-App Events for general promotions that only aim to raise awareness of your app or game.
- Choose the right event badge. Event badges appear above your event card’s title and serve as quick identifiers. They help users instantly understand what your event is about.
- Create the right metadata. Apple reviews your event based on the metadata you provide, so make sure it accurately describes what the event is and what users can expect. Incorrect or misleading metadata can cause delays or issues in the review process. This information also appears throughout the App Store to promote your event.
- Add the right media. Use catchy but accurate visuals. Images should clearly reflect the event and instantly communicate its purpose. Event videos autoplay and loop, so make sure your video has a smooth, seamless loop. Fortunately, Apple allows you to preview your event card and details page, so you can make sure everything looks great.
- Nominate your app for featuring. Reach out and share your In-App Event with the editorial team through nomination. All you need to do is submit upcoming developments through the App Store Connect. You can submit one or multiple nominations. Ask if they can include your event in their promotional programs. The team regularly showcases new apps and games, updates, exclusive rewards, and yes, In-App Events. If your event gets featured, expect a big boost in exposure.
Here are a few important guidelines to follow:
- Use proper capitalization and punctuation.
- Avoid unverifiable claims like “#1 app” or “best app.”
- Don’t include specific pricing, since this varies by region.
- Refrain from using logos or text in your images whenever possible.
- Apple applies crops and gradients to your media. So don’t add your own borders or gradients.
- Maintain visual consistency by using similar colors and illustration styles.
- Only use metadata and media that you own or have permission to use.
- Determine event priority. By default, events are listed on your product page based on start time, with the soonest event appearing first. However, you can mark certain events as high priority to change their placement and highlight them more prominently.
- Track your event performance. Go to App Store Connect and open App Analytics to monitor how your In-App Events are performing. You can filter by event, check how many downloads each event generated, and see where users discovered your event. You’ll also get insights into user engagement, impressions, event detail page views, app opens, and how many opted in to receive notifications. Use this data to refine your strategy and make smarter decisions.
Apple In-App Events are truly a remarkable tool to boost your app’s visibility and exposure. However, your competitors are using them too. That’s why it’s important to familiarize yourself with the tips and guidelines we’ve shared here. Practice is key, and always gather relevant data so you can adjust your In-App Events as needed.